Moving your WordPress site by hand may sound intimidating, but with the right steps, it’s totally doable. Whether you’re changing hosts for better performance, stronger security, or better customer support, migrating manually gives you full control. Let’s walk through the process one step at a time.
Pick a New Hosting Provider
Before you start, you’ll need to decide where your WordPress site is going. Think about why you’re switching hosts in the first place. If you experienced slow load times or downtime, look for a host with better speed and uptime guarantees. If your old host lacked support, prioritize providers known for great customer service. Also, consider what type of hosting fits your needs. Shared hosting is affordable but shares server resources. VPS hosting provides more dedicated space without the cost of a full server. Dedicated hosting gives you an entire server to yourself. Managed hosting includes technical help like automatic updates and backups. Choose the type that suits your priorities, whether that’s security, storage space, reliability, or support.
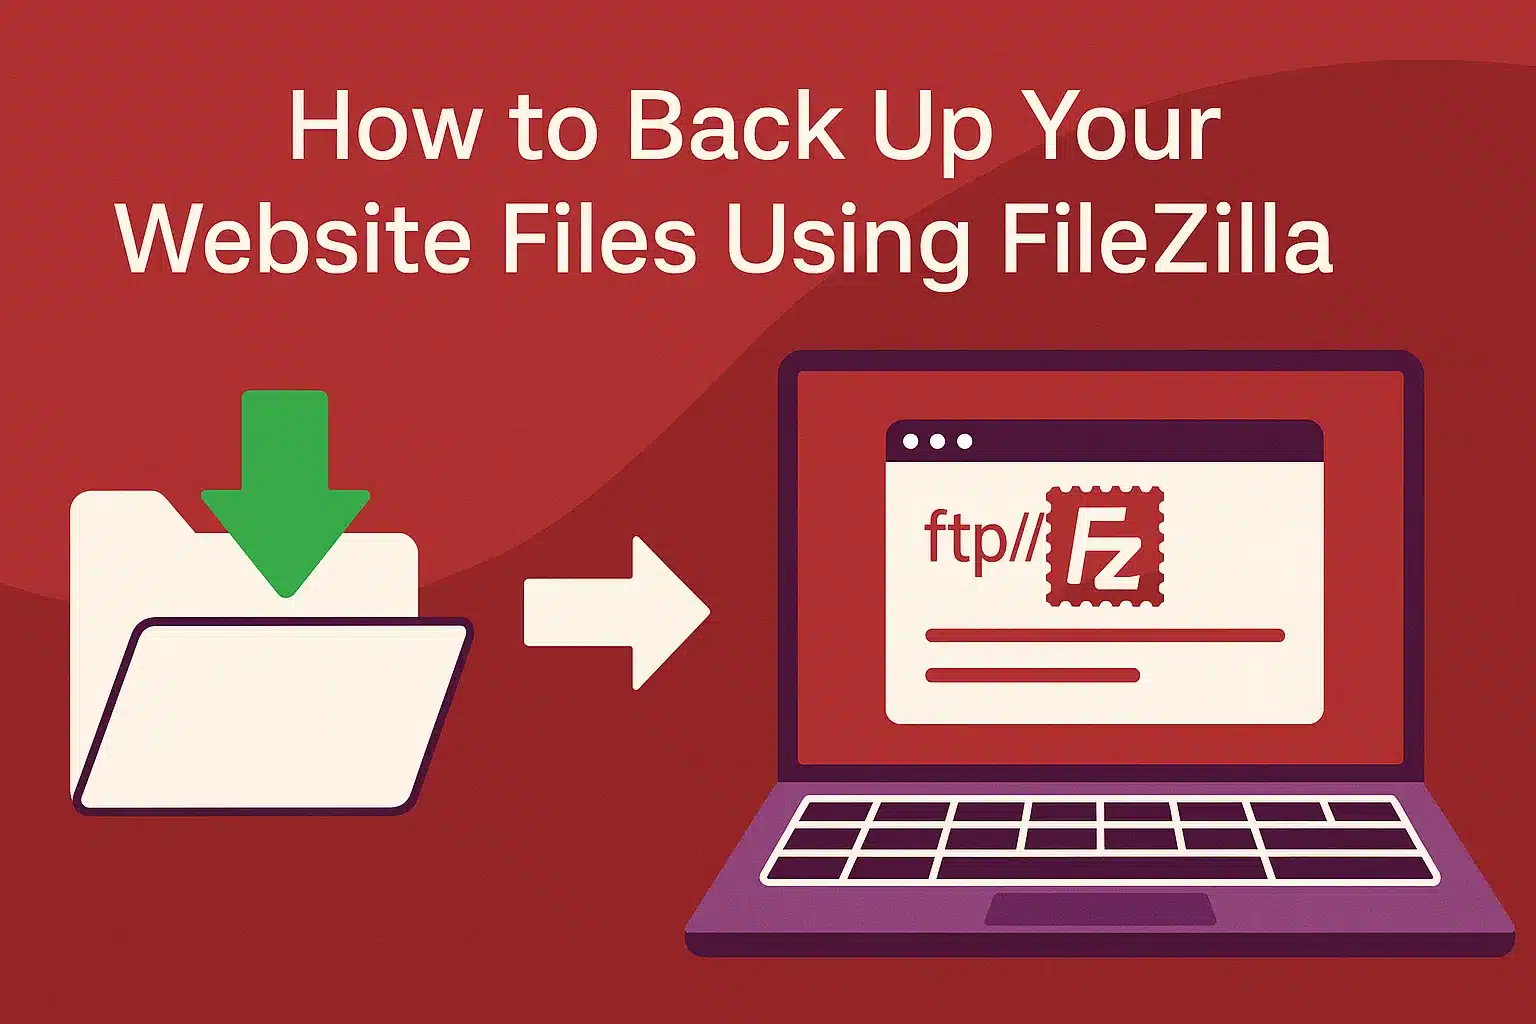
Back Up Your Website Files
The first real step in your migration is making a complete copy of your site’s files. You’ll need an FTP tool to do this. FileZilla is a great free option. Connect to your site using FTP and go to your root folder. This is typically called public_html or www. Right-click the folder and select Download. This saves all your WordPress files to your computer. It may take a few minutes depending on your site’s size, but once done, you’re ready to move forward.
FileZilla Instructions
To start your WordPress migration, you’ll need a full backup of your website files. This means everything that makes your site look and function properly: themes, plugins, media files, and core WordPress files. The easiest and most reliable way to do this is with an FTP (File Transfer Protocol) tool like FileZilla, which connects your local computer to your website’s server.
What You’ll Need:
- Your FTP credentials (host or server address, username, and password. These are usually found in your current host’s control panel)
- FileZilla installed on your computer (it’s free and easy to download)
- A folder on your computer where you’ll save the site files
Connecting to Your Website Using FileZilla
- Open FileZilla.
- At the top of the window, you’ll see four boxes for your FTP details:
- Host: Usually your domain name (like example.com) or your host’s IP address
- Username and Password: Provided by your hosting company
- Port: Leave this blank or type 21 if your host doesn’t specify a different one
- Click Quick connect. If your credentials are correct, FileZilla will connect to your site and display two file panels:
- On the left: your computer’s files
- On the right: your website’s server files
Finding and Downloading Your WordPress Files
- Once connected, navigate to the public_html folder (or sometimes called www or htdocs) on the right side. This is your website’s root folder where all WordPress files are stored.
- Select all the contents inside the root folder (you can click one and press Ctrl+A or Cmd+A).
- On the left side, create a new folder where you want to save the backup. You can name it something like WordPress-Site-Backup.
- Drag and drop all the files from the right panel (your server) into that new folder on the left panel (your computer).
- This downloads a complete copy of your website to your local machine. Depending on the size of your site, it could take a few minutes or more.
Re-uploading the Files to the New Host
- When you’re ready to upload your site to the new host, you’ll repeat a similar process in reverse.
- Connect to your new hosting account using FileZilla with the new FTP credentials provided by your new host.
- On the right panel, navigate to the root directory of your new site. It may also be labeled public_html or www.
- On the left panel, go to the folder where you saved your WordPress backup.
- Drag and drop all the files from your backup folder (left) to the new site’s root folder (right).
- FileZilla will begin uploading your website files to the new host. Again, this may take time depending on your internet speed and the number of files.
Quick Tips
- Always back up both your files and your database before making any changes
- If you’re using a custom theme or made changes directly to theme files, make sure those are included in the download
- Keep your local backup folder organized. It helps if you ever need to restore or repeat the process
Back Up Your Database
Your files are saved, but now you need your database. This is where all your posts, users, and content live. Log into your hosting control panel and find the database management section, usually called phpMyAdmin. Choose your WordPress database from the list, and you’ll see all the tables that make up your site’s structure.
Using phpMyAdmin
Now that you’ve backed up your website files, the next important step is to export your WordPress database. This database holds everything from your blog posts and user accounts to site settings and plugin configurations all the information that makes your site function the way it does.
The easiest way to do this is by using a tool called phpMyAdmin, which is usually available through your hosting control panel (like cPanel, Plesk, or a custom dashboard).
What You’ll Need:
- Access to your current hosting account
- Login details to access phpMyAdmin (usually bundled in your hosting control panel)
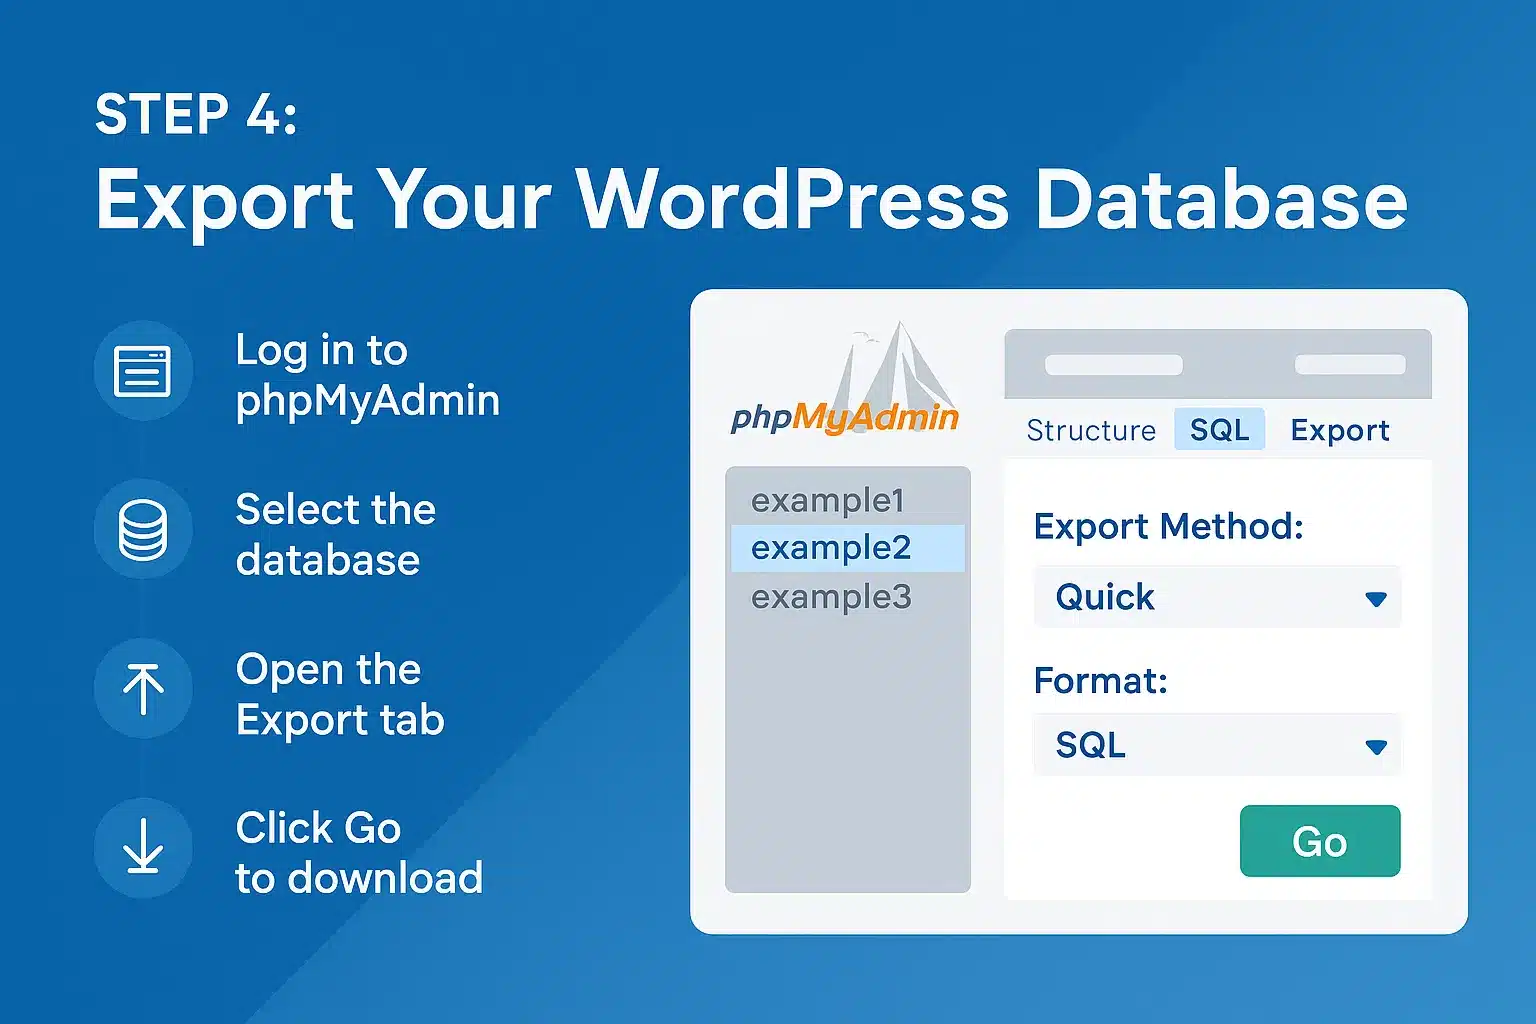
How to Export Your Database Using phpMyAdmin
- Log into your hosting control panel
Start by logging into your hosting account. Look for the Databases section, and click on the phpMyAdmin icon. This will open a new window that takes you to the database management interface.
Select your WordPress database
Once phpMyAdmin opens, you’ll see a list of databases on the left-hand side. If you’re not sure which one is connected to your WordPress site, you can double-check by opening your wp-config.php file (located in your site’s root folder) and looking at the line: define(‘DB_NAME’, ‘your_database_name’);
Click on the correct database name from the list. When selected, it will show you a list of tables in the main panel (like wp_posts, wp_users, wp_options, etc.).
Click on the Export tab
At the top of the phpMyAdmin screen, click on the Export tab. You’ll be presented with two export methods:
- Quick (default): This is perfect for most cases. It will export the full database in its current form.
- Custom: If you’re an advanced user and want to exclude certain tables or customize the format, you can explore this option. But for now, stick with Quick for simplicity.
Choose the file format
- Make sure SQL is selected as the export format. This is the standard format used to import the database later.
- Click Go
- Hit the Go button. Your browser will automatically begin downloading a .sql file to your computer. This file contains the full structure and content of your WordPress database.
Keep This File Safe
The downloaded .sql file is a critical part of your website. Without it, your WordPress site won’t have its posts, users, settings, or structure. Store it safely along with your site files backup from the previous step.
What’s Next?
Once you have both the site files and the database downloaded, you’re ready to set up your new hosting environment and begin re-uploading everything. The next step is importing this database into your new hosting account’s database system.
Export the Database
Once inside phpMyAdmin, click on the Export tab. Select the Quick option and hit Go. This downloads a .sql file to your computer containing all your site’s database info. You’ll use this later to recreate your site on your new host.
Create a New Database on Your New Host
Now head to your new hosting account. In the control panel, find the database section and create a new MySQL database. Add a new user and give it full permissions. Make sure to save the database name, username, and password—you’ll need them soon. Once that’s set, open phpMyAdmin on your new host, select the new database, go to the Import tab, and upload the .sql file you downloaded earlier. This brings your old site data into your new host.
Upload Site Files to the New Host
With the database ready, it’s time to upload the files you downloaded in Step 2. Use FTP to connect to your new host and navigate to the root directory. Upload everything from your original site folder. This step may take time since there are usually a lot of files. When complete, your site’s structure will be in place on the new server.
Upload Website Files
Now that you’ve downloaded your site files and exported your database, it’s time to get everything moved to your new hosting provider. This part of the process focuses on uploading the site files you backed up earlier to your new server using FileZilla (or another FTP tool of your choice).
What You’ll Need:
- FTP login details from your new hosting provider (host address, username, password, and optionally the port)
- The folder on your computer where your original website files were saved
- FileZilla installed and ready to use
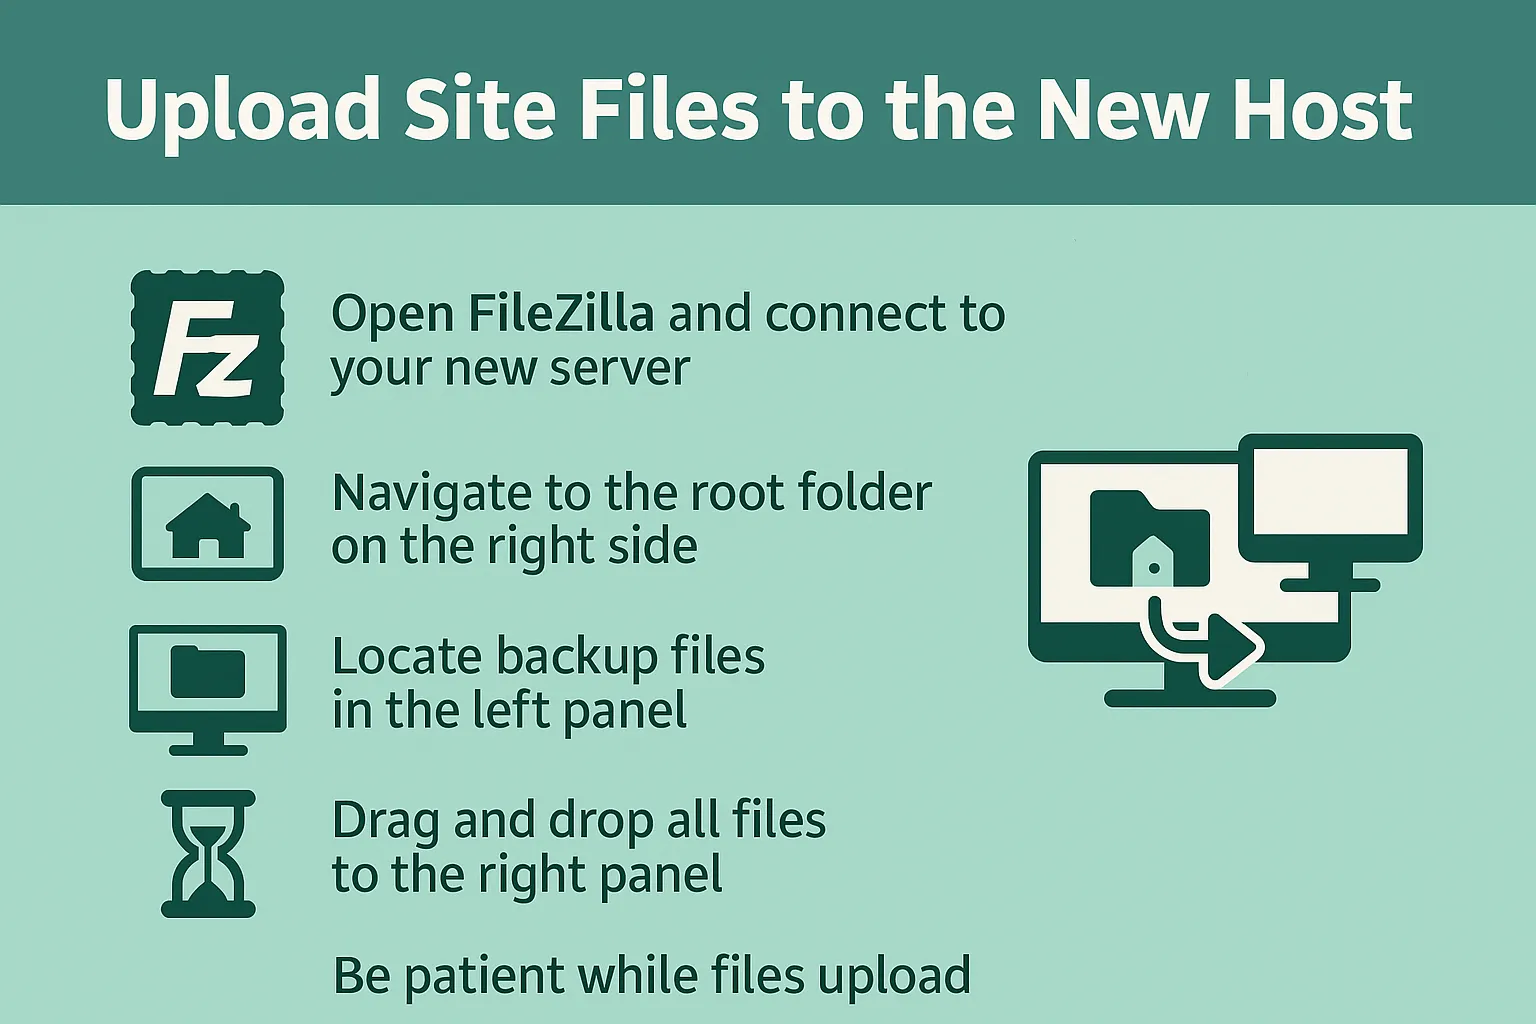
Step-by-Step: Uploading Files Using FileZilla
- Open FileZilla and connect to your new server
- Just like you did earlier with your previous host, enter your new FTP credentials into the Quickconnect bar at the top of FileZilla:
- Host: Typically your new domain name or a temporary IP address provided by the host
- Username: Provided by your new host
- Password: Your FTP password (may be different from your control panel password)
- Port: Usually 21 (leave it blank if not specified)
- Click Quickconnect to establish the connection. You should see a successful login message in the top panel.
- Navigate to the root folder on the right side
- Once connected, the right-hand panel in FileZilla represents the new host’s server. You’ll want to navigate to the root directory where your website files will live.
- This is typically labeled: public_html / www
- Or it might be a folder named after your domain
- If you’re not sure which folder to use, your hosting provider should clarify where your root directory is.
Locate your backup files on the left panel
- On the left side of FileZilla (your computer), navigate to the folder where you saved your WordPress files from the earlier backup step.
- Drag and drop all files to the right panel
- Select all contents within your local WordPress folder (you can press Ctrl+A or Cmd+A to select everything), then drag and drop them into the new server’s root folder on the right.
- This step uploads everything, WordPress core files, your theme, plugins, and uploaded media to your new server.
- Be patient while files upload
- This process may take several minutes depending on your internet speed and the number of files being uploaded. Keep FileZilla open and let it complete the transfer.
What Happens Next?
Once this is done, all your WordPress files will now exist on your new hosting account. But the website still won’t function correctly until you import your database and update the configuration file (wp-config.php) to connect the files to the new database.
Update the wp-config.php File
Now you need to connect your WordPress files to the new database. Locate the wp-config.php file in your root folder. Open it in a text editor and find the lines for database name, user, and password. Replace the old values with the new database info from Step 5. Save and close the file. At this point, your site is almost ready to go live.
Update DNS Settings
To make sure visitors reach your new host instead of the old one, you’ll need to update your DNS. Log in to the account where you purchased your domain and find the DNS settings. You’ll need the new IP address or DNS records from your new hosting provider. Enter those into your domain registrar’s settings. It may take a few hours for the changes to fully update across the internet, but once they do, your WordPress site will be live on the new host.
Migrating with a Plugin
If all of that sounds overwhelming, there are plugins that make the process easier. These tools handle everything from file copying to database import. They’re great for beginners or anyone short on time. Some plugins even let you migrate only specific parts of your site if you don’t need a full transfer.
Popular WordPress Migration Plugins
There are several plugins that can simplify the migration process. WP Migrate Lite allows you to export a complete site with just a few clicks. It even supports search and replace across your database to make sure links and data match your new environment. WP Migrate Pro adds features like multisite support, file syncing between servers, and command line integration. Another great option is WPvivid, which is completely free and supports unlimited site sizes. It also allows you to create backups and restore them on your new host manually or automatically.
Migrating your WordPress site manually isn’t as hard as it sounds. With careful steps and a bit of patience, you can take your entire site from one host to another without losing any content or functionality. And if manual migration isn’t your style, plugin tools can help you make the move with confidence and ease.